ChipWhisperer Nano - Fault injection on an external target
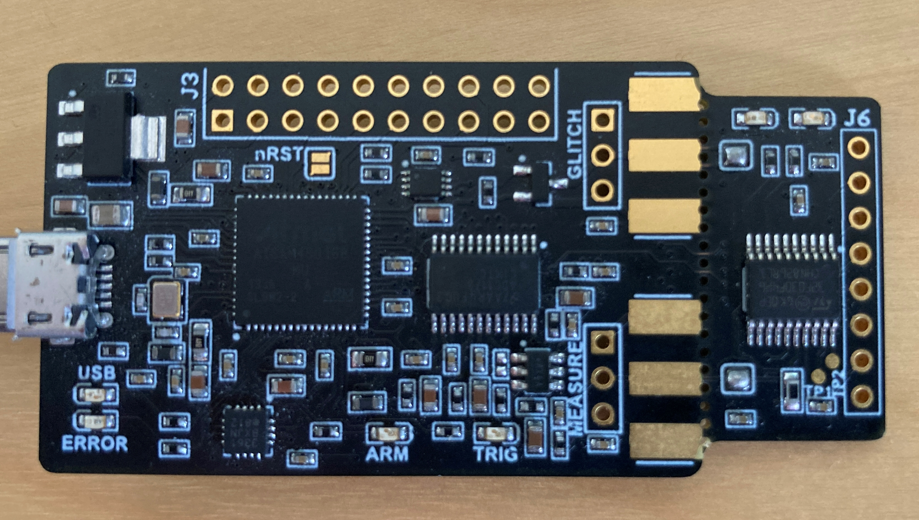
In order to use a different target than the one attached to the board, we are required to de-solder the two jumpers (one for the GLITCH, the other for the MEASURE)
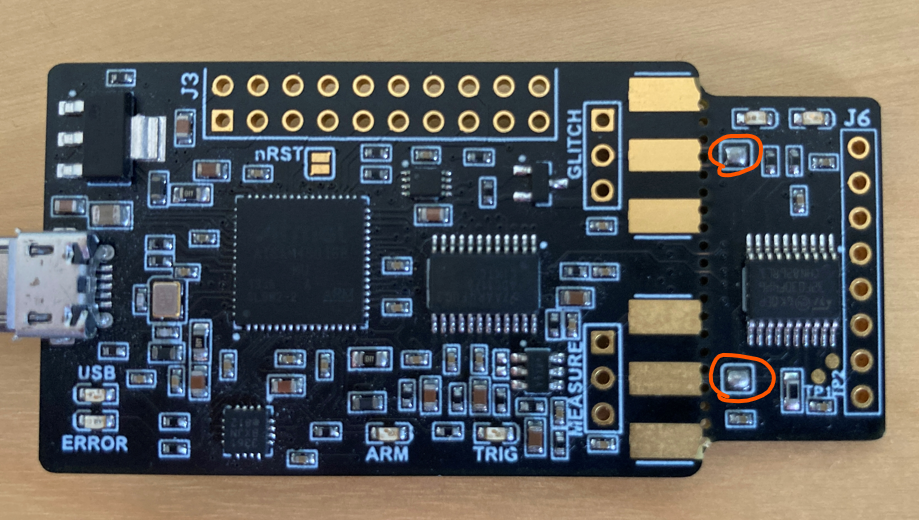
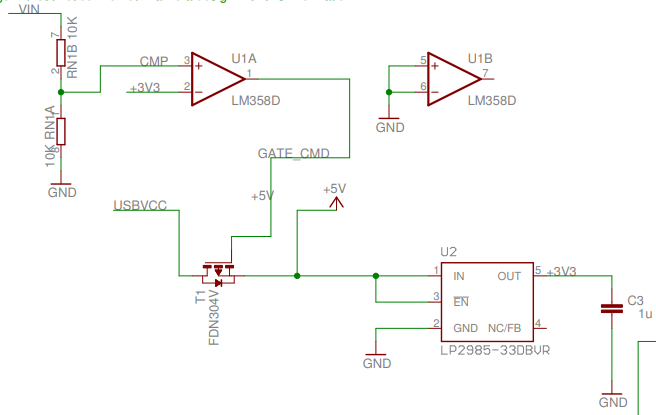
From the datasheet itself of the target as it is connected to the CWNANO main board
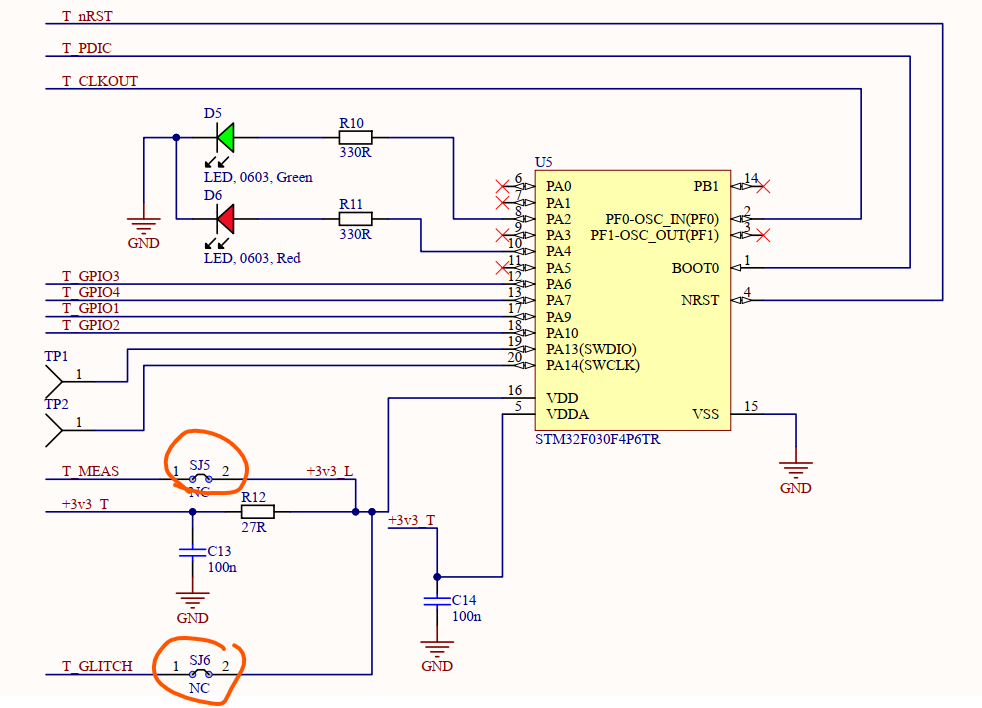
The datasheet can tell us what’s on the other side of the jumpers:
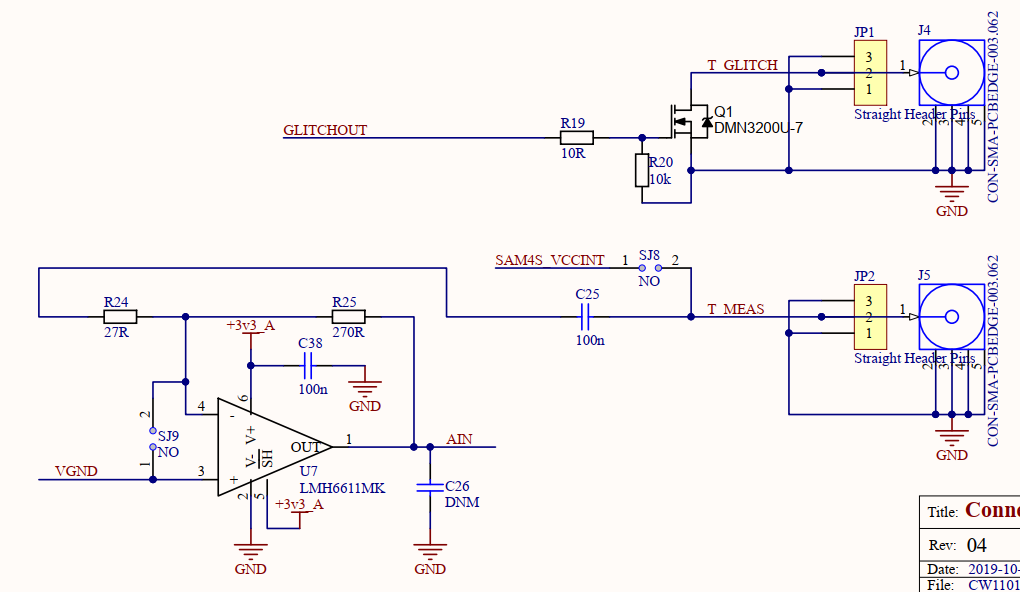
The upper circuit is the one responsible for the crowbar’s glitching. We can see that when the GLITCHOUT is active: that is - the signal which triggers the glitch - then the MOSFET allows for current to flow from T_GLITCH to… well, GND. Effectively “shorting” the VCC to the GND (because T_GLITCH is connected to the target’s VCC).
Why short VCC to GND? well, that’s how we perform the crowbar’s glitch. You short the VCC to GND for a very short amount of time and then release it, this sometimes have the effect of shaking the entire system without causing a reboot. Of course we will later see how it all depends on some of the parameters used.
We wish to have a clear path to the VCC that we can control without interference. In the Arduino Uno board, using the obvious “Vin” line is not really helpful as it is used as an input to a voltage regulator which feeds the rest of the board. We are not interested in this line because shorting this “Vin” to GND for a short amount of time will most probably be regulated by the voltage regulator as this is what it is supposed to be doing.
Let’s have a look at the datasheet of the Arduino Uno from here
Vin’s path to 5V and 3V
Well as, the 5V leg goes directly to the ATMega of the Arduino as it really supposed to be an output leg, but that works for input as well in our case:
So supplying a 5V to the device should be just fine.
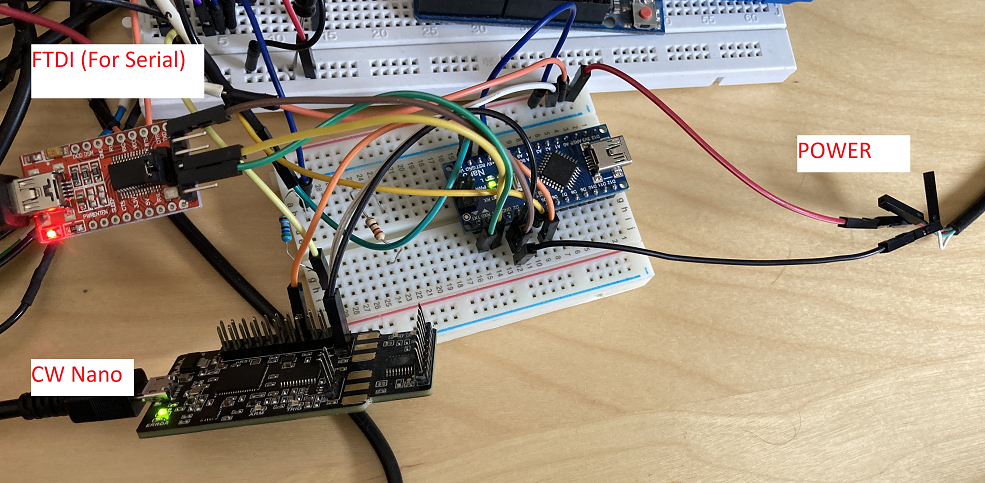
There are many ways to supply an arbitrary 5V without a power supply. The simplest way I could think of was to use a TTL cable from the computer but only used the 5V and the GND pins it has to power up the Arduino and that’s it.
In the following schematic I refer to the computer using the TTL table as a simple the “Power Source”. It is important to note again, that I use this computer only for its USB port, so it would feed the power to the Arduino and that’s it - IT IS NOT CONNECTED VIA USB or anything!
The ChipWhisperer will be connected to my working computer which we will do the analysis and everything on.
The setup looks something like this:

I have connected the Arduino’s serial to the PC so we can keep track of the glitching results. I did not want to use the regular USB port to the Arduino as it would also feed the power and I want the Power Source to be the only power supply here.
The blue leg is connected from Arduino leg 7 (I change this later in the code so keep that in mind) to the GPIO4 of the ChipWhisperer which is PIN16:
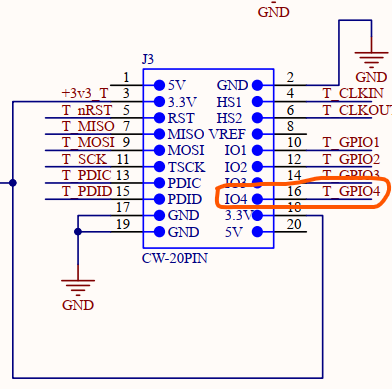
And of course, the orange line is connected to the ChipWhisperer’s T_GLITCH so the CW will be able to pull this line to the GND and create the glitch.
All the hardware is setup. Let’s go to the computer and use the ChipWhisperer.
On Windows 10, all I really needed to do in terms of prerequisites was to install:
-
Chipwhisperer latest package from pip or straight from source (Git)
Note: I had some trouble trying to install from Pip as it would not install the latest version of the Python package, and that version was problematic. So if you run into the same issue - git clone the package and install the package from source (run the
python ./setup.py installfrom the repo itself) -
Jupyter notebook
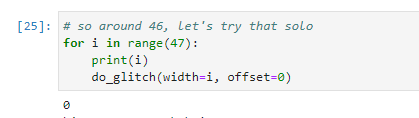
pip install jupyter-labshould do the trick
Let’s start with the notebook:
Great! the package is installed and we’re ready to start. The outdated firmware warning can be ignored for now, but it can be very easily updated.
Here’s how the CW NANO is doing the glitch:
In order to be precise, you do not really tell the CW to glitch in plain Python code, that would be terribly slow and inaccurate. Instead, we configure CW so that when it senses a GPIO trigger in its GPIO4 leg, then the GLITCHOUT will be activated and a glitch will occur. This can be done thanks to the fact that the CW itself is an FPGA so these stuff do not have to be by software, which is great!
This leaves the precision to be dependent mostly on the GPIO trigger itself. In this Arduino example, we write the code which is running on the target and can raise a trigger at the precise time. But on a real target which you don’t write the code and want to glitch - you have to figure out the timing issue yourself. Sounds scary but definitely possible as we will later see.
Before telling the CW to listen for a trigger and do a glitch, we need to configure two parameters:
https://chipwhisperer.readthedocs.io/en/latest/api.html#chipwhisperer.scopes.CWNano.glitch
scope.glitch.ext_offset- “Offset from rising edge of trigger & when glitch gets inserted, approx = 8.3 ns * ext_offset”scope.glitch.repeat- “Width of glitch in cycles (approx = 8.3 ns * width)”
Quite simple actually, we need to tell CW how long to wait from trigger (we can tell it 0), and we need to define for how long the glitch will be.
Both parameters are really the key to successfully glitching the target. If you wait too long to trigger, you do not hit the right spot. If you perform the glitch for too long - your target will almost ALWAYS reboot and may even be damaged. The key to do this is to bruteforce your way around them and finding the right parameters.
To actually perform the trigger we need to call the scope.arm function
Arm the ADC, the trigger will be GPIO4 rising edge (fixed trigger).
After calling scope.arm(), the CW waits for the trigger to do the glitch. It will do so for exactly one trigger and if you want to use it again, you have to call scope.arm() again.
After calling scope.arm() and doing the glitch, we then call scope.capture() . We do not call this because we want a trace of the power or something, we do that to get a sense if the GPIO was even triggered. The function capture returns True if a timeout occurred and no GPIO trigger was detected.
Let’s talk parameters:
I start by specifying a exaggerated high number for repeat, for example: 10000. Simple to see the target is crashing and everything is connected as I expect it to be:
The code running on the Arduino is as follows: Note how I do not use fancy assembly or use low level registers and simply use every wrapper the Arduino framework has
#define trigger 4
#define LOOP_MAX 400

void setup() {
  // put your setup code here, to run once:
  Serial.begin(9600);
  pinMode(trigger, OUTPUT);
  digitalWrite(trigger, LOW);
  Serial.println("START");

}

void loop() {
  volatile long long i, j, k;
  k = 0;

  digitalWrite(trigger, HIGH);
  for(i = 0; i < LOOP_MAX; i++)
  {
    for(j = 0; j < LOOP_MAX; j++)
    {
      k++;
    }
  }
  digitalWrite(trigger,LOW);

  Serial.print((int) i);
  Serial.print(" ");
  Serial.print((int) j);
  Serial.print(" ");
  Serial.print((int) k);
  Serial.println();
}
The regular output of this program is:
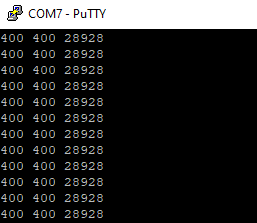
Why 28928 and not 400x400 = 160,000 ? because I couldn’t print long long so I cut the result k to int before printing it
Which is silly not that I think about it, I could cast it to unsigned int instead
Either way it doesn’t really matter. The computed value is fixed for every iteration. And why shouldn’t it be? That’s what this microcontroller was programmed to do.
Now let’s try to glitch with a very high repeat value:
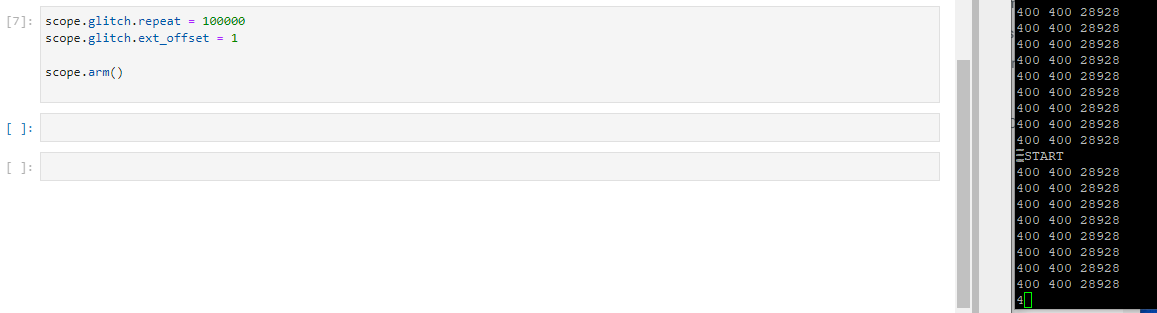
Great! we see that with a very large repeat value, the Arduino crashes. From this point it’s all about changing the parameters and observing the output.
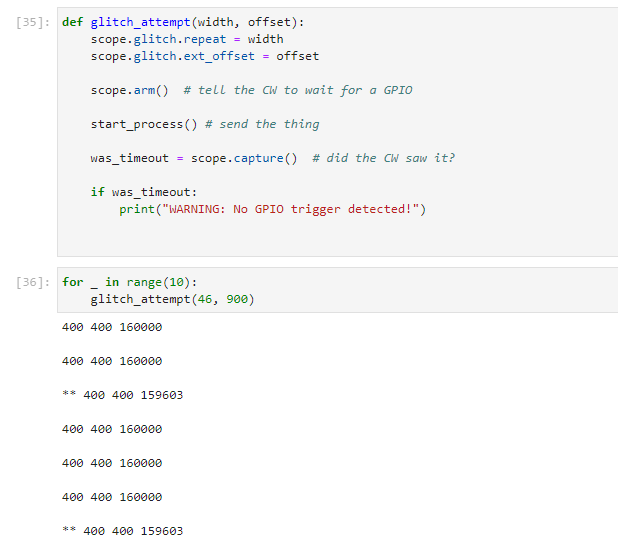
We can use PySerial to consolidate everything to a single script which will know when the glitch was successful.
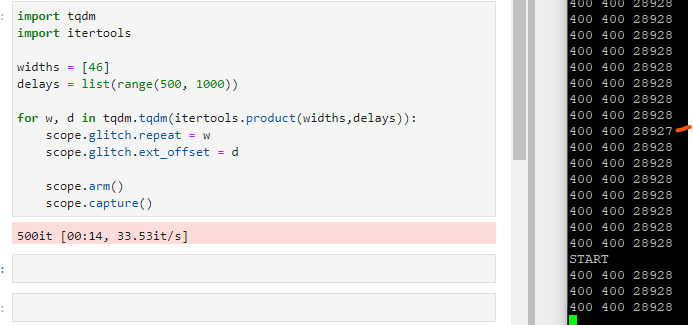
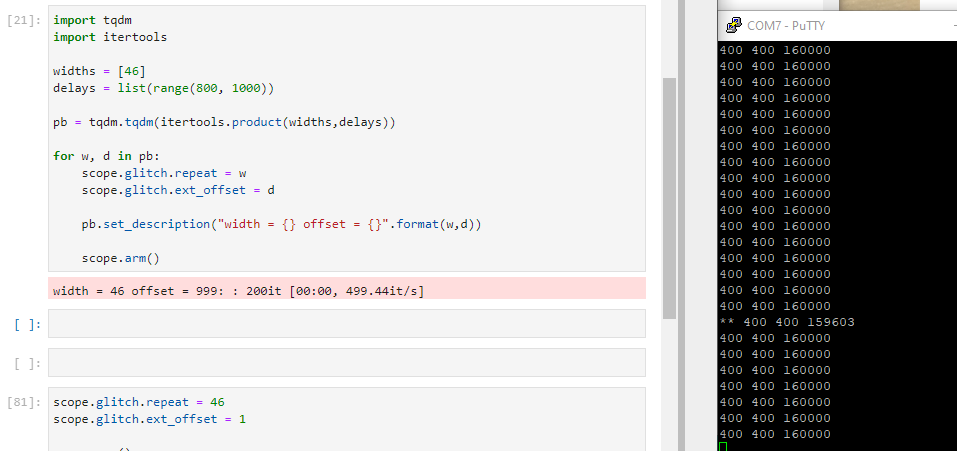
As a simple example, I started by a simple binary search looking for the right parameter and found that width a repeat of around 46, I played around with the delays to look for wrong outputs:
import tqdm
import itertools

widths = [46]
delays = list(range(500, 1000))

for w, d in tqdm.tqdm(itertools.product(widths,delays)):
    scope.glitch.repeat = w
    scope.glitch.ext_offset = d

    scope.arm()
    scope.capture()
We can see we get a nice glitch there:
Let’s fix the code a little bit:
#define trigger 4
#define LOOP_MAX 400
#define EXPECTED 160000

void setup() {
  // put your setup code here, to run once:
  Serial.begin(9600);
  pinMode(trigger, OUTPUT);
  digitalWrite(trigger, LOW);
  Serial.println("START");

}

void loop() {


  volatile unsigned long i, j, k;
  k = 0;

  digitalWrite(trigger, HIGH);
  for(i = 0; i < LOOP_MAX; i++)
  {
    for(j = 0; j < LOOP_MAX; j++)
    {
      k++;
    }
  }
  digitalWrite(trigger,LOW);

  if (k != EXPECTED)
  {
    Serial.print("** ");
  }


  Serial.print(i);
  Serial.print(" ");
  Serial.print(j);
  Serial.print(" ");
  Serial.print(k);
  Serial.println();
}
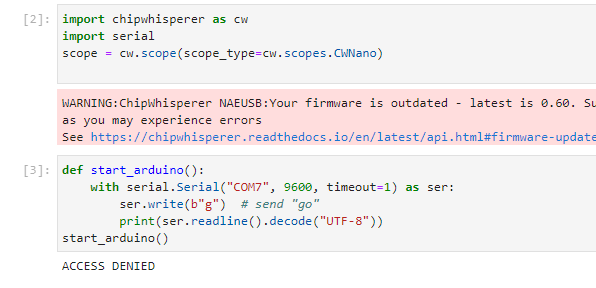
Now, we want something we can actually trigger. So the next target will be waiting for a trigger from serial (which can be sent from the PC), loops and returns back the computation.
This will give us direct control over every single glitch
-
The Arduino code
  #define trigger 4
  #define LOOP_MAX 400
  #define EXPECTED 160000

  void setup() {
    // put your setup code here, to run once:
    Serial.begin(9600);
    pinMode(trigger, OUTPUT);
    digitalWrite(trigger, LOW);
    Serial.println("START");

  }

  void loop() {

    while(1)
    {
      if (Serial.available() > 0 && Serial.read() == 'g')
      {
        break;
      }
    }

    volatile unsigned long i, j, k;
    k = 0;

    digitalWrite(trigger, HIGH);
    for(i = 0; i < LOOP_MAX; i++)
    {
      for(j = 0; j < LOOP_MAX; j++)
      {
        k++;
      }
    }
    digitalWrite(trigger,LOW);

    if (k != EXPECTED)
    {
      Serial.print("** ");
    }


    Serial.print(i);
    Serial.print(" ");
    Serial.print(j);
    Serial.print(" ");
    Serial.print(k);
    Serial.println();
  }
Very cool!
Now let’s try to glitch ourselves into a branch we’re not supposed to access
New code :
#define trigger 4
#define LOOP_MAX 400
#define EXPECTED 160000

void setup() {
  // put your setup code here, to run once:
  Serial.begin(9600);
  pinMode(trigger, OUTPUT);
  digitalWrite(trigger, LOW);
  Serial.println("START");

}

void loop() {
  volatile char t = 0;

  /* wait for 'g' */
  while(1)
  {
    if (Serial.available() > 0)
    {
      t = Serial.read();
      if (t == 'g')
      {
        break;
      }
    }
  }

  digitalWrite(trigger, HIGH);

  if (t == 'g')
  {
    Serial.println("ACCESS DENIED"); // Always denied, you need 'g' to get outside of the loop
  } else{
    // Should never enter here, unless you glitch it right
    Serial.println("** ACCESS GRANTED!! **");
  }

  digitalWrite(trigger,LOW);

}
So everything works, when we send “g” we get ACCESS DENIED as expected. We can also go look at the compiled binary and verify the other branch does in fact exists but I’m just going to assume the compiler is not that smart to eliminate the other branch.
Let’s try glitching:
Amazingly, we do find that sometimes the branch was taken and we get access granted!!
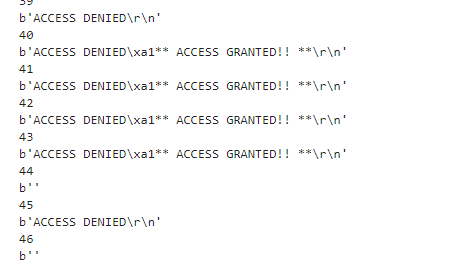
Let’s try that again except this time we wish to only receive the ACCESS GRANTED output
Couldn’t reach that, could only get both outputs, but that’s ok - I will try that later on a different target code which will probably change the parameters as well
Glitch Analysis
Continuing from the Arduino code in SPA on a timing attack resistant password check,
I wanted to try to glitch the power and observer how the parameters are changing the output.
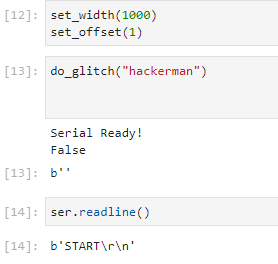
set_width(1)
set_offset(0)
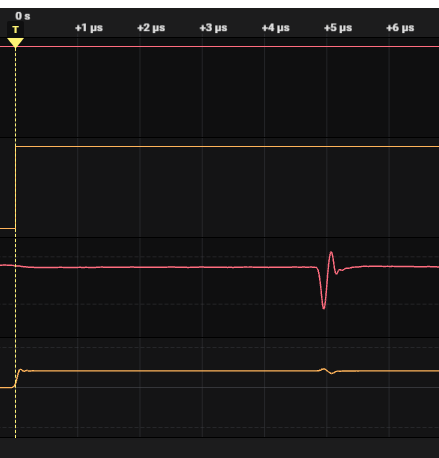
Let’s set the width to 10:

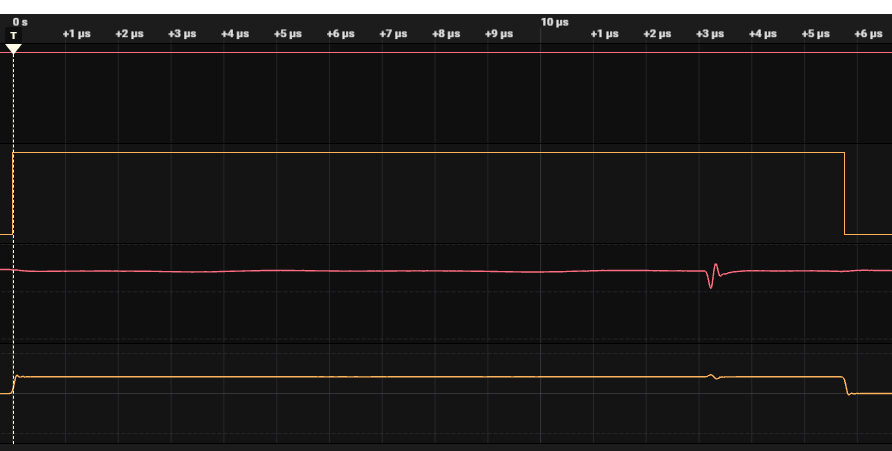
The glitch occurs at roughly the same offset (which is 0, but it takes a while I guess for the ChipWhisperer to kick in, 5 microseconds is OK but I guess that for high-end targets this is not enough.
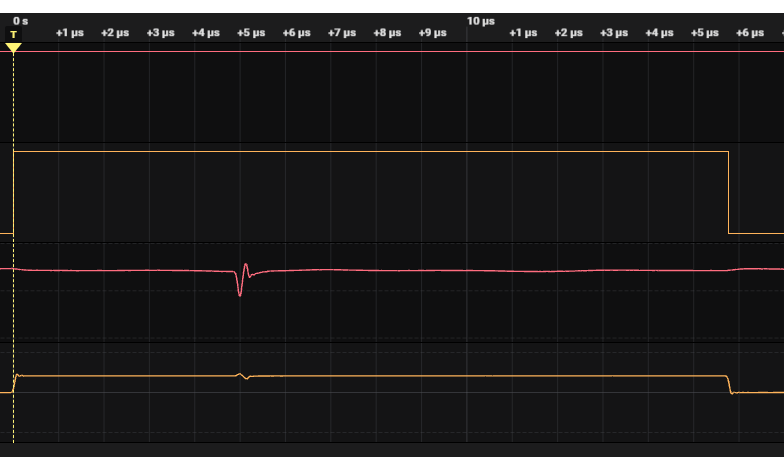
When increased to a width of 100 and offset of 1:
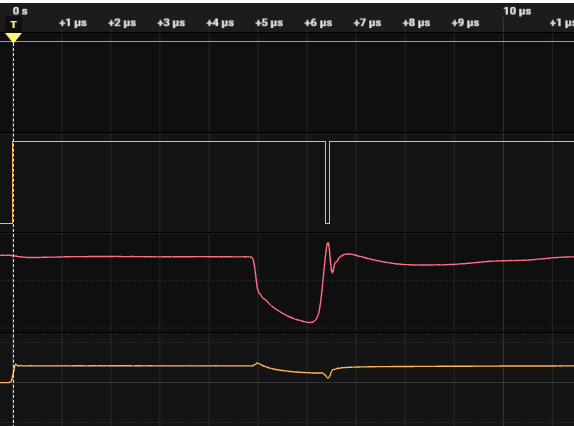
The glitch is seriously wider
Important Note! You do NOT want to power the device using the USB cable which is going directly to the PC. Glitching will have effect on the FTDI driver and will cause the COM port to disconnect and other weird stuff. Power the device using some battery (or source) and connect your PC to the serial only
The setup on the Arduino Nano this time:
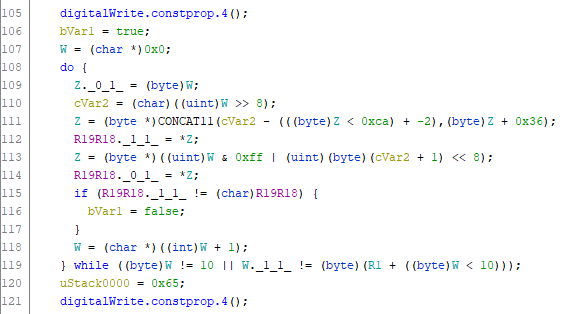
If we wish to get a “CORRECT” response back, we need to consider the loop again: (I should probably compare the assembly and not the C code)
digitalWrite(trigger, HIGH);
for (int i = 0; i < PASS_SIZE; i++)
{
  if (buf[i] != secret[i])
  {
    res = 0;
  }
}
digitalWrite(trigger, LOW);
After the TRIGGER, there’s an initial phase of assignment
Assuming the glitching will cause an instruction skip, we have two options here:
- Glitch every single if statement which would turn “res” to 0 so we end of with a 1 at the end and thus result in a CORRECT response from the device
- Exit the loop before the first comparison
To verify we can really exit the loop prematurely without checking a single byte, we have to look at the assembly:
To learn where are the compiled files, go to Arduino IDE preferences to turn on verbose mode while compiling and compile your code:
C:\Program Files (x86)\Arduino\arduino-builder -dump-prefs -logger=machine -hardware C:\Program Files (x86)\Arduino\hardware -tools C:\Program Files (x86)\Arduino\tools-builder -tools C:\Program Files (x86)\Arduino\hardware\tools\avr -built-in-libraries C:\Program Files (x86)\Arduino\libraries -libraries C:\Users\shakedd\Documents\Arduino\libraries -fqbn=arduino:avr:nano:cpu=atmega328old -ide-version=10819 -build-path C:\Users\shakedd\AppData\Local\Temp\arduino_build_68461 -warnings=none -build-cache C:\Users\shakedd\AppData\Local\Temp\arduino_cache_740836 -prefs=build.warn_data_percentage=75 -prefs=runtime.tools.avr-gcc.path=C:\Program Files (x86)\Arduino\hardware\tools\avr -prefs=runtime.tools.avr-gcc-7.3.0-atmel3.6.1-arduino7.path=C:\Program Files (x86)\Arduino\hardware\tools\avr -prefs=runtime.tools.arduinoOTA.path=C:\Program Files (x86)\Arduino\hardware\tools\avr -prefs=runtime.tools.arduinoOTA-1.3.0.path=C:\Program Files (x86)\Arduino\hardware\tools\avr -prefs=runtime.tools.avrdude.path=C:\Program Files (x86)\Arduino\hardware\tools\avr -prefs=runtime.tools.avrdude-6.3.0-arduino17.path=C:\Program Files (x86)\Arduino\hardware\tools\avr -verbose C:\Users\shakedd\Documents\Arduino\some_pwm\cw_target_pwcheck_sca\cw_target_pwcheck_sca.ino
C:\Program Files (x86)\Arduino\arduino-builder -compile -logger=machine -hardware C:\Program Files (x86)\Arduino\hardware -tools C:\Program Files (x86)\Arduino\tools-builder -tools C:\Program Files (x86)\Arduino\hardware\tools\avr -built-in-libraries C:\Program Files (x86)\Arduino\libraries -libraries C:\Users\shakedd\Documents\Arduino\libraries -fqbn=arduino:avr:nano:cpu=atmega328old -ide-version=10819 -build-path C:\Users\shakedd\AppData\Local\Temp\arduino_build_68461 -warnings=none -build-cache C:\Users\shakedd\AppData\Local\Temp\arduino_cache_740836 -prefs=build.warn_data_percentage=75 -prefs=runtime.tools.avr-gcc.path=C:\Program Files (x86)\Arduino\hardware\tools\avr -prefs=runtime.tools.avr-gcc-7.3.0-atmel3.6.1-arduino7.path=C:\Program Files (x86)\Arduino\hardware\tools\avr -prefs=runtime.tools.arduinoOTA.path=C:\Program Files (x86)\Arduino\hardware\tools\avr -prefs=runtime.tools.arduinoOTA-1.3.0.path=C:\Program Files (x86)\Arduino\hardware\tools\avr -prefs=runtime.tools.avrdude.path=C:\Program Files (x86)\Arduino\hardware\tools\avr -prefs=runtime.tools.avrdude-6.3.0-arduino17.path=C:\Program Files (x86)\Arduino\hardware\tools\avr -verbose C:\Users\shakedd\Documents\Arduino\some_pwm\cw_target_pwcheck_sca\cw_target_pwcheck_sca.ino
Using board 'nano' from platform in folder: C:\Program Files (x86)\Arduino\hardware\arduino\avr
Using core 'arduino' from platform in folder: C:\Program Files (x86)\Arduino\hardware\arduino\avr
Detecting libraries used...
"C:\\Program Files (x86)\\Arduino\\hardware\\tools\\avr/bin/avr-g++" -c -g -Os -w -std=gnu++11 -fpermissive -fno-exceptions -ffunction-sections -fdata-sections -fno-threadsafe-statics -Wno-error=narrowing -flto -w -x c++ -E -CC -mmcu=atmega328p -DF_CPU=16000000L -DARDUINO=10819 -DARDUINO_AVR_NANO -DARDUINO_ARCH_AVR "-IC:\\Program Files (x86)\\Arduino\\hardware\\arduino\\avr\\cores\\arduino" "-IC:\\Program Files (x86)\\Arduino\\hardware\\arduino\\avr\\variants\\eightanaloginputs" "C:\\Users\\shakedd\\AppData\\Local\\Temp\\arduino_build_68461\\sketch\\cw_target_pwcheck_sca.ino.cpp" -o nul
Generating function prototypes...
"C:\\Program Files (x86)\\Arduino\\hardware\\tools\\avr/bin/avr-g++" -c -g -Os -w -std=gnu++11 -fpermissive -fno-exceptions -ffunction-sections -fdata-sections -fno-threadsafe-statics -Wno-error=narrowing -flto -w -x c++ -E -CC -mmcu=atmega328p -DF_CPU=16000000L -DARDUINO=10819 -DARDUINO_AVR_NANO -DARDUINO_ARCH_AVR "-IC:\\Program Files (x86)\\Arduino\\hardware\\arduino\\avr\\cores\\arduino" "-IC:\\Program Files (x86)\\Arduino\\hardware\\arduino\\avr\\variants\\eightanaloginputs" "C:\\Users\\shakedd\\AppData\\Local\\Temp\\arduino_build_68461\\sketch\\cw_target_pwcheck_sca.ino.cpp" -o "C:\\Users\\shakedd\\AppData\\Local\\Temp\\arduino_build_68461\\preproc\\ctags_target_for_gcc_minus_e.cpp"
"C:\\Program Files (x86)\\Arduino\\tools-builder\\ctags\\5.8-arduino11/ctags" -u --language-force=c++ -f - --c++-kinds=svpf --fields=KSTtzns --line-directives "C:\\Users\\shakedd\\AppData\\Local\\Temp\\arduino_build_68461\\preproc\\ctags_target_for_gcc_minus_e.cpp"
Compiling sketch...
"C:\\Program Files (x86)\\Arduino\\hardware\\tools\\avr/bin/avr-g++" -c -g -Os -w -std=gnu++11 -fpermissive -fno-exceptions -ffunction-sections -fdata-sections -fno-threadsafe-statics -Wno-error=narrowing -MMD -flto -mmcu=atmega328p -DF_CPU=16000000L -DARDUINO=10819 -DARDUINO_AVR_NANO -DARDUINO_ARCH_AVR "-IC:\\Program Files (x86)\\Arduino\\hardware\\arduino\\avr\\cores\\arduino" "-IC:\\Program Files (x86)\\Arduino\\hardware\\arduino\\avr\\variants\\eightanaloginputs" "C:\\Users\\shakedd\\AppData\\Local\\Temp\\arduino_build_68461\\sketch\\cw_target_pwcheck_sca.ino.cpp" -o "C:\\Users\\shakedd\\AppData\\Local\\Temp\\arduino_build_68461\\sketch\\cw_target_pwcheck_sca.ino.cpp.o"
Compiling libraries...
Compiling core...
Using previously compiled file: C:\Users\shakedd\AppData\Local\Temp\arduino_build_68461\core\wiring_pulse.S.o
Using previously compiled file: C:\Users\shakedd\AppData\Local\Temp\arduino_build_68461\core\WInterrupts.c.o
Using previously compiled file: C:\Users\shakedd\AppData\Local\Temp\arduino_build_68461\core\hooks.c.o
Using previously compiled file: C:\Users\shakedd\AppData\Local\Temp\arduino_build_68461\core\wiring.c.o
Using previously compiled file: C:\Users\shakedd\AppData\Local\Temp\arduino_build_68461\core\wiring_digital.c.o
Using previously compiled file: C:\Users\shakedd\AppData\Local\Temp\arduino_build_68461\core\wiring_analog.c.o
Using previously compiled file: C:\Users\shakedd\AppData\Local\Temp\arduino_build_68461\core\wiring_pulse.c.o
Using previously compiled file: C:\Users\shakedd\AppData\Local\Temp\arduino_build_68461\core\wiring_shift.c.o
Using previously compiled file: C:\Users\shakedd\AppData\Local\Temp\arduino_build_68461\core\CDC.cpp.o
Using previously compiled file: C:\Users\shakedd\AppData\Local\Temp\arduino_build_68461\core\HardwareSerial.cpp.o
Using previously compiled file: C:\Users\shakedd\AppData\Local\Temp\arduino_build_68461\core\HardwareSerial2.cpp.o
Using previously compiled file: C:\Users\shakedd\AppData\Local\Temp\arduino_build_68461\core\HardwareSerial3.cpp.o
Using previously compiled file: C:\Users\shakedd\AppData\Local\Temp\arduino_build_68461\core\HardwareSerial0.cpp.o
Using previously compiled file: C:\Users\shakedd\AppData\Local\Temp\arduino_build_68461\core\PluggableUSB.cpp.o
Using previously compiled file: C:\Users\shakedd\AppData\Local\Temp\arduino_build_68461\core\IPAddress.cpp.o
Using previously compiled file: C:\Users\shakedd\AppData\Local\Temp\arduino_build_68461\core\HardwareSerial1.cpp.o
Using previously compiled file: C:\Users\shakedd\AppData\Local\Temp\arduino_build_68461\core\WMath.cpp.o
Using previously compiled file: C:\Users\shakedd\AppData\Local\Temp\arduino_build_68461\core\WString.cpp.o
Using previously compiled file: C:\Users\shakedd\AppData\Local\Temp\arduino_build_68461\core\Print.cpp.o
Using previously compiled file: C:\Users\shakedd\AppData\Local\Temp\arduino_build_68461\core\Stream.cpp.o
Using previously compiled file: C:\Users\shakedd\AppData\Local\Temp\arduino_build_68461\core\USBCore.cpp.o
Using previously compiled file: C:\Users\shakedd\AppData\Local\Temp\arduino_build_68461\core\abi.cpp.o
Using previously compiled file: C:\Users\shakedd\AppData\Local\Temp\arduino_build_68461\core\Tone.cpp.o
Using previously compiled file: C:\Users\shakedd\AppData\Local\Temp\arduino_build_68461\core\new.cpp.o
Using previously compiled file: C:\Users\shakedd\AppData\Local\Temp\arduino_build_68461\core\main.cpp.o
Using previously compiled file: C:\Users\shakedd\AppData\Local\Temp\arduino_build_68461\core\core.a
Archiving built core (caching) in: C:\Users\shakedd\AppData\Local\Temp\arduino_cache_740836\core\core_arduino_avr_nano_cpu_atmega328old_0c812875ac70eb4a9b385d8fb077f54c.a
Linking everything together...
"C:\\Program Files (x86)\\Arduino\\hardware\\tools\\avr/bin/avr-gcc" -w -Os -g -flto -fuse-linker-plugin -Wl,--gc-sections -mmcu=atmega328p -o "C:\\Users\\shakedd\\AppData\\Local\\Temp\\arduino_build_68461/cw_target_pwcheck_sca.ino.elf" "C:\\Users\\shakedd\\AppData\\Local\\Temp\\arduino_build_68461\\sketch\\cw_target_pwcheck_sca.ino.cpp.o" "C:\\Users\\shakedd\\AppData\\Local\\Temp\\arduino_build_68461/core\\core.a" "-LC:\\Users\\shakedd\\AppData\\Local\\Temp\\arduino_build_68461" -lm
"C:\\Program Files (x86)\\Arduino\\hardware\\tools\\avr/bin/avr-objcopy" -O ihex -j .eeprom --set-section-flags=.eeprom=alloc,load --no-change-warnings --change-section-lma .eeprom=0 "C:\\Users\\shakedd\\AppData\\Local\\Temp\\arduino_build_68461/cw_target_pwcheck_sca.ino.elf" "C:\\Users\\shakedd\\AppData\\Local\\Temp\\arduino_build_68461/cw_target_pwcheck_sca.ino.eep"
"C:\\Program Files (x86)\\Arduino\\hardware\\tools\\avr/bin/avr-objcopy" -O ihex -R .eeprom "C:\\Users\\shakedd\\AppData\\Local\\Temp\\arduino_build_68461/cw_target_pwcheck_sca.ino.elf" "C:\\Users\\shakedd\\AppData\\Local\\Temp\\arduino_build_68461/cw_target_pwcheck_sca.ino.hex"
"C:\\Program Files (x86)\\Arduino\\hardware\\tools\\avr/bin/avr-size" -A "C:\\Users\\shakedd\\AppData\\Local\\Temp\\arduino_build_68461/cw_target_pwcheck_sca.ino.elf"
Sketch uses 1934 bytes (6%) of program storage space. Maximum is 30720 bytes.
Global variables use 230 bytes (11%) of dynamic memory, leaving 1818 bytes for local variables. Maximum is 2048 bytes.
The line we care about is: (look for the value for the -o parameter)
"C:\\Program Files (x86)\\Arduino\\hardware\\tools\\avr/bin/avr-gcc" -w -Os -g -flto -fuse-linker-plugin -Wl,--gc-sections -mmcu=atmega328p -o "C:\\Users\\shakedd\\AppData\\Local\\Temp\\arduino_build_68461/cw_target_pwcheck_sca.ino.elf" "C:\\Users\\shakedd\\AppData\\Local\\Temp\\arduino_build_68461\\sketch\\cw_target_pwcheck_sca.ino.cpp.o" "C:\\Users\\shakedd\\AppData\\Local\\Temp\\arduino_build_68461/core\\core.a" "-LC:\\Users\\shakedd\\AppData\\Local\\Temp\\arduino_build_68461" -lm
Found it:
We don’t have to go full reverse engineer on the binary, there’s an ELF file which Ghidra would happily read for us:
Confirmed with the assembly, there is a do-while nature to the loop as it is implemented by the compiler. There’s a first check, and then the other check is determining whether to continue the loop or not.
So if we want to glitch a specific spot - we have to know the first character (or byte), get to the while condition check, and glitch there.
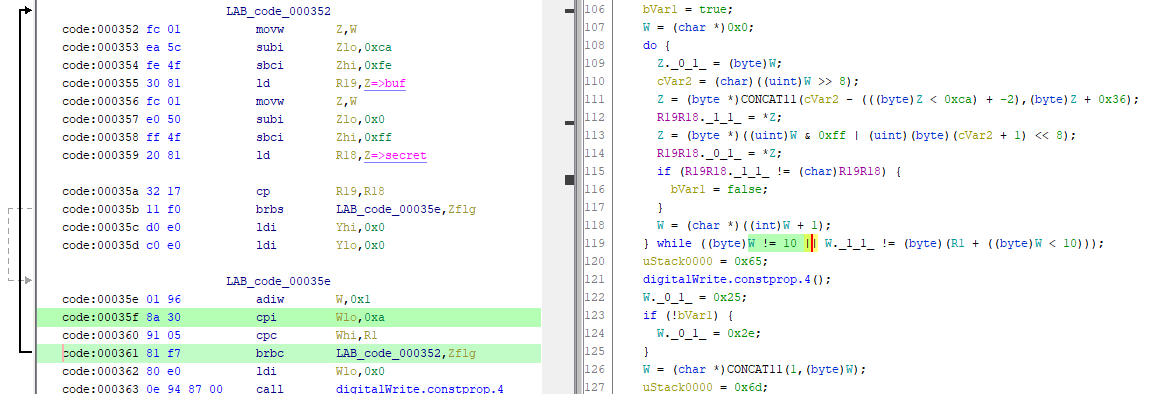
Note the black line to the left which indicates where the loop starts
So here’s out target - we want to glitch the instruction at 361: the brbc jump
This is really a small target to hit, but from the attacker’s perspective - all he can control is the glitch offset and the width.
Let’s do a sanity check - if we set the width to be ridiculously high: (1000)
We get no immediate output after the operation and we later read the serial to see the “START” happening. So we need to construct some mechanism to effectively detect when the device has crashed.
When the offset is set to 1000:
When the offset is set to 0:
We cannot really glitch at the beginning of the loop because the CW Nano is not cut off for something like that, it is still too slow.
There’s around 5 microseconds (which is 5000ns) delay between the trigger and the actual glitch,
We know the Arduino runs at a frequency of 16 MHz, so each cycle the microcontroller performs takes:
\[\frac{1}{16,000,000} = 62.5 ns= 0.0625 \mu s\]If the entire GPIO which wraps the loop takes 15 microseconds, which is 15,000 ns - how many cycles did the Arduino perform?
\[\frac{15,000ns}{62.5ns} \approx 240 \text{ Cycles}\]It is very important to remember that instruction does not equal a cycle. And some instructions may take more than a few cycles to complete.
Looking at the assembly again we see around 20 instruction from the first digitalWrite until the branch - assuming every instruction is around 1-2 cycles, the computation pretty much adds up if we also assume that a loop takes around 24 cycles, and the password length is 10, which it is.
The question we ask ourselves now is when the glitch at offset 0 really occurs in the loop:
We know from looking at the trace that the time from the GPIO trigger to the actual glitch is around 5 microseconds. So - how many cycles did the CPU perform in this time?
\[\frac{5 \mu s}{62.5ns} = \frac{5,000ns}{62.5ns} \approx 80 \text{ Cycles}\]Again, because the gap between the GPIO and the actual glitch is measured manually in the Saleae GUI, the 5 microseconds time period is not accurate
So around 80 cycles, if we assume each iteration takes 24 cycles, then 80 cycles means around 3-4 iterations.
\[\frac{80}{24}=3.33...\]So we assume that only around the 3rd loop - the glitch is inserted.
If we really want to know how many cycles are performed in a single loop we can open the datasheet and instruction manual to look at each instruction and see how many cycles it performs.
For the sake of experimenting, let’s just change the correct password to be 5 bytes correct and the rest are incorrect - this will still give us a possibility to glitch our way outside of the loop.
In the future, on a real target - we will use more accurate equipment that the ChipWhisperer Nano which obviously has its limitation, but we’re here to learn - and the best way to learn about the ChipWhisperer models would be to actually encounter the limitation the CW Nano gives you.
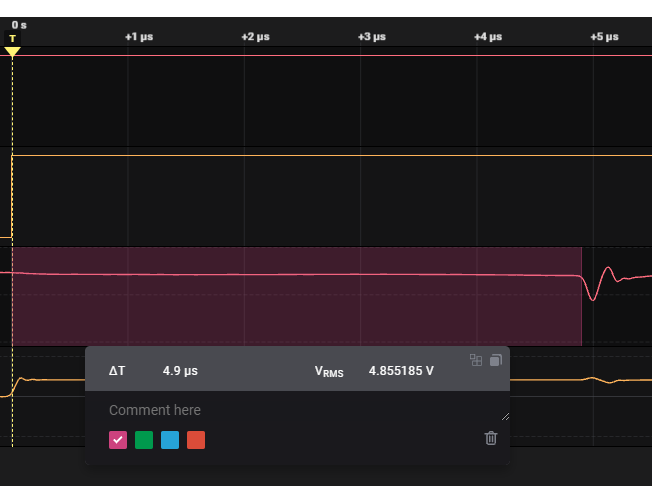
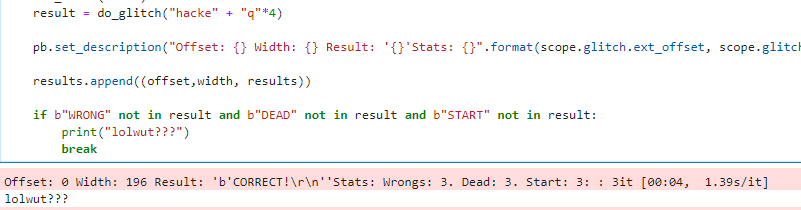
Wow, after just a few tries - we actually managed to escape the loop and get a CORRECT despite the fact we entered a password with only 5 correct bytes
got a CORRECT response when sending 5 correct password bytes. Parameters are offset: 0 and width: 196
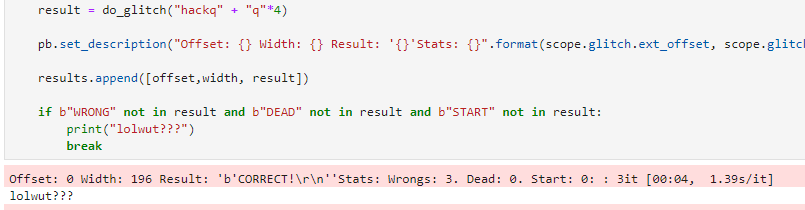
I fixed the “START” bug and let’s see if we can repeat it
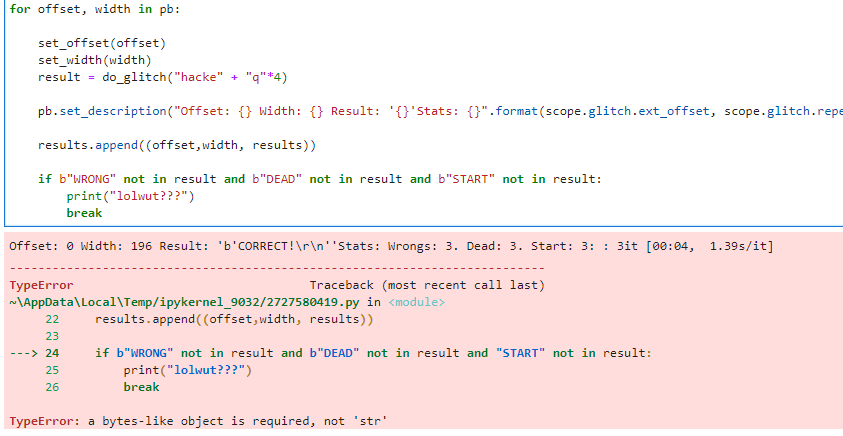
Wow, the same parameters are the ones that were successful again (width: 196 offset: 0)
Even with only 4 bytes it works (I guess our computation from before was not that off from the truth):
3 correct bytes seem to not do the trick, I let it run for a while - but as time goes on, the offset is increased and the glitch is going away from the position we wish to hit.
So, very cool! we can glitch a computation, we can glitch a branch, and also glitch our way outside of a comparison loop! What’s even more impressive is that no capacitors were removed, and the last experiment with the loop break was actually performed on an off-the-shelf Arduino Nano board and same with the Uno - I did not touch this one at all.